
Just a quick peek! I finished this earlier today, but let's go back to this past October and work our way forward, shall we?

Remember my Santos, Saint Lucia? Well....Granddaughter Isabel never cared for the fact that her hair is painted on. Well...we can't have Isabel disappointed, now can we? So I made her a crown! After all, she is a Saint!

Doesn't she look much better? Isabel thinks so too!

I forget how tedius handwork can get sometimes, but I think it always turns out better in the end, don't you?

The material looks and feels like felted wool, although I'm sure it's a synthetic. It's from a blanket I found in a thrift shop (I think). I've had it for years and am just now starting to use it. Some of the beads are vintage, such as the pearl ones, and the blue ones are from a necklace I broke, which never quite went back the same way it began!

The scattered gold glass beads were a happy accident, but I like the finished effect.

Now.....doesn't she look happier? And Isabel is happier with her too!
While we're on the subject of headwear, I also created a Halloween Witch Hat for Lucia. Yes, I know, I know.....a Saint in a Witch Hat. Welcome to my world! However, Lucia looked quite beautiful in it. But for the life of me, I can't find the pictures I took so you'll have to wait till this coming Halloween to see her all dressed up. How did I do it? I removed her wings (I love the fact that they're removable) and then I placed a lovely spider collar around her throat. She also had spider bracelets and a spider had also created a black web on her dress! It was quite lovely against the blue! I did find two photos of the hat I made; here they are.

Initially, I had all sorts of ideas on how to create a witch hat, but I eventually settled on a cardboard cone shape. Simple and to the point - literally! I spray painted it black, then I made a series of cuts into the cardboard, about two inches long, all the way around the base. I then set it up on a table (like it's shown above) and squished it down (yes, there is such a word as "squished"!). This made the flaps splay outward, creating the brim of her hat!

I spot-glued a variety of ribbons and trims around the cone and, for a special touch, I used vintage pom-pom fringe that belonged to my grandmother, around the base. Then I glued a variety of orange colored buttons on each of the brim pieces. I finished by gluing two pieces of organza ribbon on the inside, which I then tied under Lucia's chin! The effect was rather smashing, if I say so myself!
I just wish I could find those pictures I took! Knowing me, I probably deleted them accidentally!
Next on the agenda - do you remember the sewing machine cover I made about a year ago? Well, I decided to line it, which gave it more structure. I had a great time making it, as you can imagine.

The Dutch Doll is one from a baby quilt my Gran made me years ago.
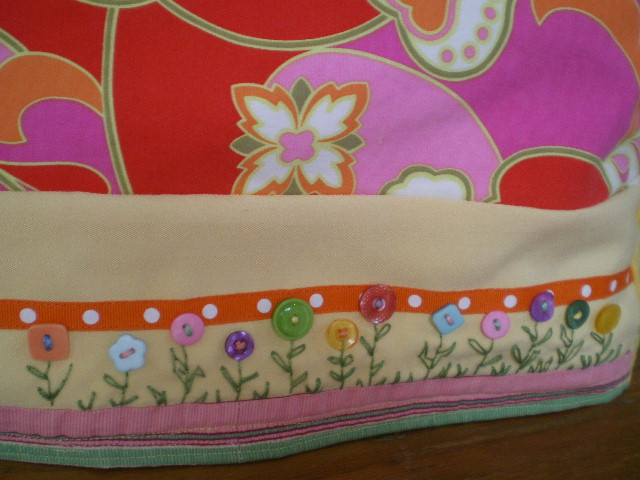
Spring flowers!! Lots of fun to make and VERY EASY!! One of the tricks is to use contrasting thread in the button holes!

Lovely bright sun, don't you think?

Yes, I do love color, especially as I get older! Hmmm.....I wonder if this means I'll wear purple hats soon? I hope not. I HATE how hats look on me!

Reverse side! The kitty was Isabel's contribution! I cut the tree trunk free-handed from gold-brown craft felt, then free-motion stitched it with contrasting thread to hold it in place and give it a "wood grain" look. The leaves are actually made of a sturdy paper!! I love their colors! I bought them ages ago, but realized I couldn't use them on anything that would have to be dry cleaned. So they sat and waited very patiently till I created this tree for them!

Ever heard of the saying, "Once in a blue moon"? Okay, so I have a strange sense of humor! What can I say? The large button in the center is a vintage one my Aunt Von gave me!
I love blue and green together.

I thought this side needed something special, so I put a lady's fancy boot on it. Inside the boot is a sweet letter that Isabel wrote me! It's a lovely way to save little keepsakes. Every now and then, I take it out and read at it. Makes me smile every time!

More of Gran's pom-pom fringe! The tape measure is actually a silk ribbon that came from a
gift bag! I cut the flowers free- hand in different shapes, free-motion stitched it with contrasting thread and added buttons and leaves! Told you I had fun creating it!
So.......you might think it would be hard to top this wild and wacky cover, but I think I did, only in a completely different style! See what you think of this denim one!

Side 1. I've collected bits and pieces of fabric appliques from worn out jeans and jean dresses for years. I get them at the thrift shop! I had no idea what I was going to do with them, so they too waited patiently for me! The middle part is from a jean dress that Isabel outgrew; a nice keepsake! I can still picture her wearing it.

At first, I thought I might make the sides plain Well.....that thought didn't last very long, now did it? The question was - how to come up with something that would coordinate with all the colors of the front and back. Simple solution really; candy colored buttons with contrasting thread!

I have this "thing" for pockets! I have a storage container full of them. Inside this pocket I sewed a felt flower that came off a Papyrus greeting card. I LOVE their cards!! They inspire me and give me great ideas! I remember Isabel wearing jeans with this sweet pocket on them! How fast they grow up!

These flowers came from a thrift shop dress that had them stitched all along the hemline. The petals are silk organza ribbon.

A better side view! The center buttons I stacked one on top of the other and used contrasting thread.

An aerial view!

Side 2 - and my favorite!! This is such a great way to save bits and pieces from worn out clothes! The center strip, with the different colored buttons, belonged to a dress of Isabel's. Do you notice a recurring theme here? Okay, okay. I'm a Grandmother. What do you expect?!?!

A close up. These pink flowers with sequins were scattered over the legs of a pair of thrift shop jeans which had seen much better days. So I had to rescue them!

The base has what I think is called a button plaquet? Or maybe not. Can't remember and too lazy to go look it up. I thought it was a nice touch!

Another close-up. You can incorporate all kinds of fabrics and trims.

The top left needed something that coordinated with the white embroidery. After trying several pieces of jewelry, buttons and beads, I decided on a simple piece of white linen with vintage buttons sewn on in a row.
Lovely side view. And even though I don't have a picture of it, I lined it with jean material from a old worn out jean shirt! My next plan - perhaps doing a cover using animal prints! That should be pretty cool, don't you think?
As you can see, it's never boring at Fursdon House! Hope everyone had a lovely Valentine's Day! My Hubby bought me a dozen red roses! Wasn't that sweet? Would you believe it - we're coming up on our 33rd Wedding Anniversary in May! Wow! Where did the time go?
Love and Blessings! Jan