Sunday, October 31, 2010

Kid's Halloween Party!! (AKA: Bedlam Comes To Madison!!)

Here they are!  The photos from last night's Halloween Party!  We had a blast!  I think we had more fun because it was for children, so acting goofy was the order of the night!!

First - The Costumes!!

The Lovely 1920's Flapper - Isabel!!

Hey, I'm the Grandma here! I can put more than one photo of her!  So there!!
Lovely, isn't she?  Not that I'm prejudiced you understand! Ha!

The Scary Spook - Charles!!

The Super Cool Mario - Alex!!

The Enchanting Enchantress - Becca!

The Prettiest Pumpkin in the Patch - Clara!
And guess what? Clara's Mom, Stacey, wore this costume when she was a little girl! How cool is that?!

The Fairest Fairy Princess of Them All - Payton!

The Best Costume Winner!!  The Fabulous Fairy Princess Elysa!

The Marvelous Mermaid Rebecca!
The Coolest Cat Around - Jenna!  Meow!

We had one other - The Awesome Allyson (4th from the left), but she was hiding behind a pillow when individual photos were taken!  So here they all are!!  The table in front of them was set for the "Decorating Your Own Cupcake" Contest!!  Results are below!!  Now is this a great crowd, or what?!?!

Now for the Food!! We had more than what's shown (WAY too much!!), but it wasn't nearly as cool and crazy as these are so they didn't make the photo list!  Poor things!

Fingers!!  Now don't bite your nails!!
Yikes! I didn't know Spiders liked Cheese Cubes! Eeeeeek!! 

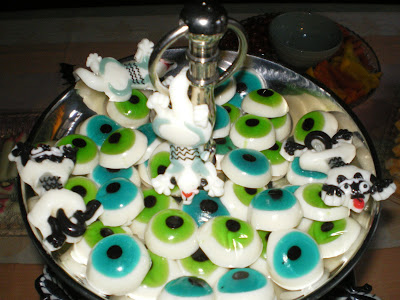
Eyeballs and Road Kill!!  I know...I'm sick!  The "road kill" have little tire tracks across their backs!  I don't think the kids even realized it, which is probably a good thing (a VERY good thing!).  Besides, the little animals looked super cute (especially as long as you didn't realize their condition!)

More Road Kill, Plus Bugs, Beetles and Spiders!! Yum!!

And let's not forget the Green Centipedes!!!
Probably the sickest thing of all - "Bloody Band-Aids"!!  (What can I say? It's Halloween!!) 

Cutest little Mummies you ever did eat!! Hot dog halves, wrapped in crescent rolls, with mustard dot eyes!!
Drunken Hangover Eyes!!  (AKA: Deviled eggs, green olive slices and strips of ketsup)
 
A Martha Stewart Moment!! From my Mother no less!! Go Mom!!  She left before
the noisy crowd arrived!  Smart woman!!

Isn't she cute?  Meow!! Meow!!

Here, let me give you a HAND with that bloody punch!! (Cran-Apple Juice and Gingerale!)

Cupcake Decorating Winner - Elysa!! Top Right, with "things"
 hanging down and eyeballs protruding, and generally quite disgusting looking!!

Way too much imagination going on here!

Ghoul School has nothing on these kids!

One of Your Lovely Hosts - The Little Devil!!  Pat, my Aunt and Co-Host for all this insanity!!

And finally..............what you've all been waiting for!!!!

Yours Truly!!
Looking lovely as ever!! Oh, but wait! It gets EVEN better! 

Now you know why they have Halloween!! So lovelies like myself can come out at night!!!

Happy All Hallows Eve Everyone!!

And remember - Tomorrow (1 November 2010) is
 All Saints Day!!!

Jan

Saturday, October 30, 2010

Vintage Halloween Postcard Banner!

One last quick post before Halloween and the party tonight (for ten 8-year-olds!! YIKES!!).  After this post, you'll get to see photos of the party and just how absolutely smashingly beautiful I look - in REAL person - despite the ugly photo at right!!

Here it is - despite my very poor photography attempts late last night - my first Halloween Banner!


These are postcards that came in a book I purchased about 20 years ago and NEVER did anything with!  Okay, so I'm a little slow!  Anyway, I actually bought two of the books, one for "doing something with" and the other to just look at, admire and make photos from for further use.  And this year was "the year" so I carefully removed them from the book, drew a bead of white school glue around the edges, heavily sprinkled glitter on the glue and let it dry, punched holes in the top corners, ran an orange length of grosgrain ribbon through and hung it.  The polka-dot orange ribbon bows are not attached yet (and may not be because it's VERY easy just to put the bows up on top of the three tea-cup hangers!  And I LOVE easy, especially when it LOOKS not very easy!! :)

And just one last comment about those beautiful shelves - my husband Nigel handmade them for me when we first moved in because I didn't have anywhere to put my books!  On every inside vertical board he drilled 3 holes across, every 6 inches top to bottom.  Then he cut little 3/4 inch pieces of dowel rods, which go into the holes.  The shelves then rest on the dowels.  This way, I can move the shelves anywhere within 6 inches of where I want!!  And he says I'm anal retentive!!  Ha!!!        Happy Halloween Eve Eve!  Jan

Thursday, October 28, 2010

Gnarly Halloween Tree! BOO!!

I've created a new Halloween tree for this year!  I was actually working in the garden last weekend (and for those of you who know me, you know how RARE that is!!) and I decided to pull up an old Rosemary bush that had seen better days LONG AGO!!  After snipping away at it with the clippers, I finally got it out of the ground and realized it would make a FABULOUS Halloween tree!!  I forgot to take pictures "before" decorating it, but you can still see how cool it is!

Front view - It's covered in ornaments Isabel and I have made over the past few years, as well as family favorites we've either purchased or received as gifts.  The two green paper witches (only one of which is showing on the right of the photo) were given to my daughters when they were little!


Back view - A good view of the pumpkins we made one year out of felt.  I let Isabel cut them out herself; I think she was about six at the time! We LOVE doing our crafts together! 

Mr. Mummy!! Boris Karlof - eat your heart out! You ain't got nothing on MY MUMMY!! I made two of them last year.  I just cut out a Gingerbread Man shape from card stock, then took bandage gauze and started wrapping it around his head, then arms, torso and finally the legs, putting bits of white school glue here and there to hold it all together.  The eyes and mouth are made from an ink pen.  Too easy!!  You could even use a cookie cutter of a Gingerbread Man, and the gauze works best if you cut it in strips, rather than trying to use just one long piece.


Mr. Corn Man!  Isn't he sweet?  Isabel made him in Kindergarten (I think).  He's lost a few kernels, but then - haven't we all?!?!

A good back view of Mr.Gnarly Himself!!

Mr. Granddaddy Long Legs!!  These are hilarious and LOTS of fun to make, as well as very easy.  Take two black chenille balls (one slightly smaller than the other if possible) and stitch them together, side by side, with black thread.  Using multi-colored yarn (I used one roll that had multiple colors in it and just cut out the colors I wanted to use), thread the yarn onto a needle with a large eye. Tie a knot in one end of the yarn, then pull the needle and yarn through the body till the knot catches.  Cut off the yarn to the desired length and knot that end too.  Finish it off by gluing googly eyes on.  And with such lively colored legs, Isabel and I decided to make the googly eyes different colors too! (Naturally!)

As for the tree and holder - Spray paint a terracotta pot with high gloss black paint and let that dry.  Mix up some mortar or concrete mix; you want the consistency of thick cookie dough.  When it's the right consistency, spoon about an inch or so of mortar in the bottom of the pot, enough to help support the "tree" and hold it up to the height you want.  Then, while holding the "tree" up and supporting it, spoon in more mortar until it reaches the top of the pot.  Poke your spoon down inside the mortar a few times to make sure all air bubbles are released.  Then let everything dry completely before moving it.  One thing to remember - this is VERY HEAVY.  But that also means it's very sturdy and durable!!

My last Halloween tree, which we've used for several years now, is made out of long sticks Isabel and I painted black and "planted" in a large plastic container spray painted black.  It's very large and the limbs go "every which away"; with all the children here for the Halloween Party this Saturday night, I decided not to run the risk of someone poking an eye out!  Maybe he should be transported to my office next year! Or my new studio!! DUH!!!

That's about it.  Only one more thing to post about Halloween, other than the party itself (if I remember to take photos while corralling ten screaming 8-year-olds), and that's the vintage Halloween postcard banner I made!  But that's for tomorrow night! I've had it for the day!

Spooky Dreams Everyone! Jan


The Dark Side of October!!

Hi Everyone!

Sorry to take so long to get this posted.  I received a lovely ATC from Sherry at http://www.scrappingwithsherry1.blogspot.com/.  Our theme for this month at the BlissfullATCSwap is DARK, and Sherry certainly didn't disappoint!  What's really cool is that the card actually lights up!!  You press a certain spot on the bottom right, and suddenly red lights start flashing through the vampire's eyes, and also the bats' eyes!  I tried to catch it in a photo, but failed.  Sorry, but photography is not my strong suite!

Thank you so much Sherry, for such a cool ATC! I may have to hide it from Isabel though! Once she sees those lights, it may not be mine for long!!

Here's the ATC I created.  When I thought of our theme of "dark", an image of the very depths of the ocean came to mind, with all the different colors of blue.  See what you think!


Okay, I admit its not as exciting as Sherry's, but I had a great time with this one.  I used one paint card sample as the base.  From a pamphlet of different colored paint samples, I cut out 8 squares and stitched them to the base.  I then chose buttons that reminded me of the ocean's many colors and glued them to each of the 8 smaller samples.  With a blue copic marker, I outlined the smaller squares over the thread and around the edges of the base.  Voila!

Well, that's all for now! Hope you're all having a great day! Jan

Saturday, October 23, 2010

Spook House and Graveyard!! Yikes!

Hi Everybody,

Finally finished the Spook House!  Here are the photos from start to finish!  It was great fun, but it did take longer than I anticipated.  Of course, I kept adding to it, which didn't help much either!

 I started with a box shaped like a house (duh!). Isabel's very fancy Fairy Birthday Cake came in it.  I had originally thought of making a very large Gingerbread House for Christmas, but I have no more room for Christmas decorations (at least of this size).  So..what's a girl to do?  Just pick another holiday, that's what! Start by painting the box with Gesso (or a paint primer) so the other paint will adhere and cover better.

The fun part was deciding on the colors!  I'd seen several at stores (although MUCH smaller) that were all black, but I wanted a little more color and pizazz!! So I decided on deep purple and orange, along with purple and orange glitter, with accents of black on the window surrounds, door and cupola (all of which are doll house pieces).  The small bag of roughly finished "picks" (top right of photo) s what I used to create a rickety fence (seen in next photo)!  The whole bag was only about $3.00, and I have about 3/4th of the bag left!!  Hmmmm......what can I use with them next I wonder!? 

Ta Da!! Glitter Fest!!  There are 9 windows around all sides of the house (in case I want to display it differently some time). To make it appear as if a light is on inside, I traced yellow card stock to match the window frame.  On top of the card stock, while holding the frame just over it to judge for placement, I glued cut out pictures I'd found in magazines of ghosts, skeletons, etc.  Next I glued the card stock with pictures to the back of the window frame, then glued the whole thing to the side of the house!

 
I had great fun finding pictures that were small enough to work!  And all Fursdons LOVE cats so there are several of them in the Spook House!

Back of the house! Ghosts flying all over the place and one wacky skeleton!!  If you look very carefully, you'll see the right and left windows are slightly different!  They came three in a bag (much cheaper this way), but I didn't realize they were different until after I purchased them.  And I wasn't about to change my mind after I'd already painted and "glitterized" them!
Another Cat!! 

Voila!!  This is sitting in my kitchen Garden Window (which I LOVE and it makes a GREAT display for holiday "scenes" too!).  I put a brown piece of cloth down first to prevent white from showing through, then I placed the house in the center back and surrounded the whole scene with Spanish moss. 

Next came the orange pumpkins Isabel and I painted earlier (see previous blog post).  They look great, don't they?  And the skeletons came from the Dollar Store about 2 years ago.  They were strung together as a garland, but I soon remedied that little problem!  Notice the doorknob is........a hand and forearm (naturally!).  It belongs to the unhappy fellow sitting beside the door on the left.  The other guy, on the right, lost a leg, which just happens to be lying in front of him.  You can tell I enjoyed myself, can't you!?

Another view of the front.

My favorite part - the graveyard!!  I used air dry clay by Crayola and free-formed the "tomb stones" by hand, creating a little "mound" as a base which I pushed the "stones" into after they had dried.  After the bases dried, I painted the entire piece.  Here's what they each read:  "Jack O. Lantern", R.I.P. (naturally), D.M.Bones, Here Lie the Remains of Our Guests From Our  Last Halloween Party!, and Here Lies Bloody Mary (written in blood (Oops! I meant red paint!).
Although she didn't show up in the top photo, little Witchy-Poo is hanging by a supposedly invisible thread, with her broom taped to the wall.  I was going to just let her hang freely, but she kept wanting to turn so that you couldn't even tell she was there!  This is a very special witch.  My mother, Joy, made this and many other Halloween decorations when we were teenagers one year.  I've used them for as long as I can remember.  There is one minor addition though - the eye on the witch.  It's green!  Isabel insisted!

Well, there you have it!  I had intended to make a black gnarly tree from black licorice sticks.  And even though I've already purchased the licorice, I simply don't have the energy to follow through.  Maybe next year.  And the licorice won't be wasted.  Nigel LOVES the black kind!  YUCK!! 

This will be the first time in 12 years that I've had a Halloween party.  My first one was for my girls when they were 12 and 16 years old, while Nigel was stationed in Korea.  This one will be for Isabel (naturally).  I hope to take photos, but I haven't decided if I'll post them! Ha Ha  So until later then.............

Happy Halloween Everybody!!
Jan