Monday, January 24, 2022

 Hi Everyone!

I hope you're all doing well and surviving this crazy weather we've been having!

I wanted to show you my latest creations.  I've taken up the challenge by Anne Brooke for her #52tagshannemade she did in 2021. I wanted to do it last year, but life kept intervening! So I decided to do it this year and so far, I'm on track. Hopefully I'll be able to keep that up.   Here's how it works.  Each week, Anne sends out "prompts," and the idea is that you create a tag following whatever the prompt is.  And by year's end, you have 52 tags of your very own. Some might use them or give them away, but I'm planning to keep mine and either keep them in a book of some kind, or display them somehow on a wall. Anyway, I've just completed Week # 4, for the 4th week in January 2022!  And here they all are:


This is Tag #1 for the first week in January, and the prompt was: White.I personally don't care much for white; I do prefer various shades of creams, though. And I want all the tags to be identical in shape and color. I also plan to use softer colors if at all possible. The overall look I'm going for is something that looks "peaceful." I hope that makes sense.  Fortunately, I was able to make all 52 tags from scrap cardstock! And the base material is a lovely piece of Irish linen, which I think will go well with all the tags....maybe! 😊 For this tag, I've used antique and vintage lace and these precious vintage buttons. Aren't they adorable? And tiny too!  One of the buttons, the one on the bottom, still had it's original thread in it, so I matched it with some of my own thread for the other three buttons. It's the perfect color to "appear" vintage.


This is Tag #2 and the tag prompt was:  Hearts
I learned a lot when I was creating this tag and also Tag #4. For one thing, I finally realized that it's been almost 20 years since I've done any embroidery to speak of! And my eyes don't see as well, and my fingers aren't as nimble as they were 20 years ago! My DMC threads are at least that old, but probably more, and my embroidery needles are all gone! It's very sad but I'm going to take one for the team on this one and. . . . go buy some of those yummy threads I've seen people using! 😀 Some new embroidery scissors are already on their way, as well as needle threaders. I also bought some new reading glasses! So I'm almost set! I used my DMC threads in these soft green and pink colors. I drew the shape of the heart on the fabric using a stencil. Then, I stitched around it in green. I drew ivy here and there and stitched that in green, with little pink flowers.

This is Tag #3 and the prompt was: Scraps!
This one was a lot of fun because I have LOTS of scraps. I save fabric and lace scraps as long as they are at least one inch square (though I have saved smaller pieces if it's something special).  I searched through all my lace scrap bins and found these lovely pieces. Then, I determined how they looked best arranged and glued them down on the base fabric of Irish linen. Voila! I think it was more fun because it was less exacting. But that's also the beauty of this project. It's nothing too involved, but just enough to give you a little nudge to create something small. And if you take longer, then so be it. 😀


This is Tag #4 and the prompt was Fly Stitch.  I'm actually going to redo this one because I want the colors softer. I also need more practice with fly stitches! This way, you  can hopefully see my progress in the next one I do!  I love lavender and my sweet husband grows it in our garden every year. He's a fan of lavender too.  And I've also pressed quite a lot of it too! They make great journal cards and tags. Lovely scent!  😀


Well, that's all for now. I hope you've enjoyed this post.  I'd love to hear what you think.  And I'll be putting up a video about them on YouTube shortly.  The link for that will be:  https://youtu.be/h6-31KsE9xI     And my Instagram link is: 
https://www.instagram.com/ fursdonhouse

Many thanks and may God bless.  Jan

Sunday, January 16, 2022

Happy New Year 2022!!

Hi Everyone!

I've come to the conclusion that Blogger no longer sends out notifications of my posts to people even though they have subscribed to my blog! Quite irritating! And I'm not sure how to go about fixing this because I'm not that computer literate.  So I've decided that until I can figure out how to make it work, I'll just announce new blog posts periodically on my YouTube channel, and put a link there as well.  Oh well, there certainly are worse things that could happen, so I'll count my blessings.  Here are some recent pictures I've taken!


This picture was taken on January 1st!! It's my Lenten Roses in bloom! I was amazed, but very happy to see them.  And that's Brer Rabbit in the background, overseeing everything. Fortunately for him, he's concrete. Otherwise, Dundee - our very old (17+ years) and still very active cat,  would have eaten him by now!! 🐈

Another New Year's Day picture of one of our Dogwood trees! Before we had any, I never realized they have red and bluish-black berries in the winter!  And did you know there are 19 varieties of Dogwood trees? It's also our Alabama State Flower.  Now you know!


These next four pictures were taken in time sequence and shows what happened on the evening and morning of 2 and 3 January, here in Madison, Alabama!  This particular picture was taken at 8:59 pm, 2 Jan. I looked out our front door and couldn't resist grabbing the camera. Everything looked so peaceful. I also love how the lights glow from the houses in the background.


Taken at 9:30 pm, 2 January! Yes, it was coming down pretty fast and getting quite a good accumulation. The last time we had snow like this in Alabama was about 4 years ago. I think this picture would make a great Christmas Postcard!


This was taken at 10:08 pm!! Sadly, the trees that look like umbrella shapes are actually dead. They're Weeping Cherry trees and we've had three of them for about 26 years now. This past summer, they started looking quite scraggly and we asked an expert about what was needed. He asked how old they were, and then told us he was amazed, because Weeping Cherries usually only last about 20 years at best!! Of course, Nigel Fursdon not only has a green thumb; both of his hands are totally GREEN!! He even grew raspberries one year, quite successfully, and they usually only thrive in much cooler climates that you find up north!.   


Here's the final picture taken at 9:51 am, on 3 January.  All in all, we got about 4 1/2 inches here, while other surrounding areas received a lot more! Admittedly I love the snow when it gets this deep. It seems as if all the chaos and noise of the world is calmed and soothed by such heavy blankets of snow.  


I turned 62 on 4 January! And what a surprise I had! I've always been very blessed having Nigel as a husband. He gets me flowers for any special occasion, and even when I've returned home after a trip! For birthdays, we usually go out to dinner some place nice, and that afternoon, at 4:00 pm, we were going to a favorite German restaurant of mine. However, about 3:00pm, Nigel told me the restaurant had called and said they were having some difficulty and would we mind waiting until 5:00 pm to come to dinner. I agreed of course, but when we got there, Nigel started walking toward a booth that was already occupied. I couldn't see who it was seated there until Nigel moved to the side and I realized it was my Mom!  Then he told the waitress we needed a bigger table since one more person was coming.  Naturally I asked, but he said it was a surprise. So I kept wondering who it might be, but couldn't think of any one person that might come. Only couples.  Finally, after about 10 minutes, I looked behind myself to see my very best, best, best friend of all time - Sherry Craig!!  Sherry lives in Murfreesboro, Tennessee (about 2 hours north of us) and the reason for the delay that had us eating at 5:00 pm rather than 4:00 pm was that Sherry was delayed getting away. She wasn't even entirely certain she'd be able to make it because they also had a lot of snow, actually more than we did. Anyway, I bought the ruse hook, line and sinker!! And without reason if the truth be known because (1) had I thought about it, I would have remembered that this particular restaurant did NOT take reservations and (2) Sherry had already intimated she might try to come down within a few days or so! I guess turning 62 fried some of my brain cells. 😀 But I have to say, it was the loveliest birthday I've ever had!!


Isn't he the cutest pudgy bird?!? I took this picture on 7 January. The snow had cleared and I had walked out of the house to take the trash out. On my return to the front door, I looked up and saw him! He was SO STILL!  So I quietly went back inside as quick as I could and grabbed my camera. He still hadn't moved when I returned, so I was able to get several pictures.  Apparently he isn't suffering from "miss a meal colic" as my Dad used to say! 

Well, that's all for now. I hope you're all enjoying this new year 2022. It's certainly come in with a bang for us!  Take good care and may God bless.

Hugs! Jan


Friday, December 24, 2021

Merry and Blessed Christmas 2021!!

Hi Everyone!  Yes, it's Jan from Fursdon House - finally!!  The last time I updated this blog was on 4 June 2019!!  I had no idea it had been this long, but I was reading someone else's blog the other day and was really enjoying myself.  This, in turn, got me to toying with the idea of not only rejuvenating this blog, but trying my best to REALLY use it as a means to visit with all of you!  So here's my first attempt!  Not sure where it will lead, or if it will be successful, but here goes anyway.

As you can see from the title, it's Christmas Eve here in Madison, Alabama.  The weather has been lovely today and very NON-Christmassy, if I may say so.  We've had a high today of 66°F, and it's currently 64°, although Google assures me that it "feels like 63°".  So there you have it!  It's about 5:00 pm as I write this, and it's almost completely dark outside, so I can see the reindeer lit up on the lawn.  It's the only outside decorations we did this year and instead of our usual "tree in every room" on the inside, we only put up two trees, the Nautical Tree and the Vintage Kitchen Gadget Tree. To be perfectly honest, we've had so much going on the past few months, and Nigel and I were both very sick earlier this month with upper respiratory infections, which I think is what people used to call "a nasty cold"! Ick!  But we're mostly recovered now! 

So. . . . here we go!  This first post will show the few Christmas decorations we put up this year.  And as we go along, I plan to update you on all that's been going with us the past couple of years, as well as all the "current events"!


The Nautical Tree - Nigel's favorite!
On this tree we showcase all the seashells we've collected over the years from all the islands and countries we've visited.  This year, we added shells and coral we picked up in Key Largo, Florida.  I also included a large sand dollar, which hubby Nigel found on a recent scuba diving excursion with our granddaughter, Isobel, in the Atlantic Ocean, 25 miles off the coast of Myrtle Beach, South Carolina.  We've got several sand dollars, but only those we've found washed up on beaches and a few made into ornaments that we purchased.  But Nigel picked this one up off the Atlantic Ocean floor, so I think it's particularly special.


This greeting card led to the creation of the Nautical Tree!!
 In May 1997, Nigel (who was active duty Army at the time) was sent on a one-year tour to South Korea, up on the DMZ.  Having found this box of Christmas cards (which I was so pleased with) and to keep my mind off how much I missed him, especially at Christmas time, I decided to create a tree that would commemorate Nigel's love of the ocean and all things "nautical".  So I gathered all the shells we'd collected up until that time and decorated a tree with them. Did you know that shells are hard as rocks?!?!  I discovered this when I tried to pierce holes in all these muscle shells so I could hang them on the tree! I ended up using a heavy hammer and a large nail, and pounding small holes through them on the garage's concrete floor! My hands were sore for a couple of days afterward, but it was worth the work! I also found Hawaiian type leis made of small sea shells at Michael's, which I carefully took apart and rejoined to each other, creating the shell garland! It's certainly evolved over the years since and quickly became one of Nigel's favorite trees! Here are some close-ups of some of our favorite ornaments:


Scuba Diving Santa!!
Nigel's absolute favorite ornament!  We have two on the tree, one for him and one for my granddaughter Isobel, my two Master Divers. Kind of funny when you consider I can't even swim and I PANIC when water gets in my face!


The Sand Dollar Nigel found on the Atlantic Ocean floor a few months ago!


A wooden crab from Roatan, Honduras!


Mushroom Coral
I love it's absence of color and it's intricate pattern. 
It almost looks like a lace ruffle.


Lion Fish
Nigel and Isobel went lion fish hunting when we were in Roatan, Honduras a couple of years ago. I'd never heard of them, but they're fabulously beautiful, as you can see. However, their "spines" are venomous.  So you have to be very careful catching them. The "lion fish hunts" are formed to try and control their population in the Atlantic Ocean, the Gulf of Mexico and the Caribbean. Because they're native only to the Indian and Pacific Oceans, they have no known predators in these other areas where they were inadvertently introduced and their population is exploding. Just so you know - they taste DELICIOUS!! Similar to lobster!!


Red Coral 
Isn't it beautiful? I love the intricate patterns of it!


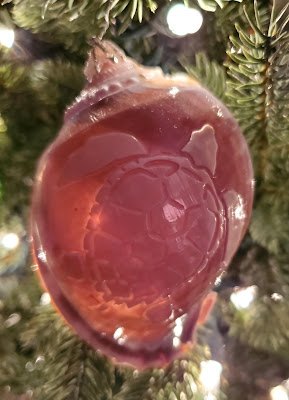
This shows how hard sea shells are;
this is a carving of a turtle on a shell.


One of the MANY ships we've collected over the years, ranging in size from a couple of inches to a couple of feet! Like I said earlier, Nigel loves all things nautical!  I like to say we have a whole fleet of ships!!


Kitchen Christmas Tree - Jan's Favorite

I started this tree after I inherited many of my Gran's kitchen items.  I love vintage pieces, especially those used in the kitchen, but I didn't have any way of showcasing them.  This "tree" actually began life as a "wreath", but over the years I've collected so many fun and interesting items that I have enough for a tree now! I'm particularly fond of the vintage pieces with red and green painted wooden handles (perfect colors for Christmas!)  This year, I decided to use my authentic goose feather tree to display everything, rather than one of my traditional trees. I like how you can see all the different items so easily, whereas they were all "lost in the greenery" on the more traditional tree.  

By the way, please don't get the idea I love to cook because I actually hate cooking! I consider myself an "adequate" cook, but I certainly don't enjoy cooking. Whenever we've had large family gatherings, the other women did the cooking while I was quite happy to do the clean-up afterward! Okay, it may sound weird, but when you're cleaning up, you don't have to concentrate on much of anything.      Here are some of my favorite pieces:


My Gran's Biscuit Cutter
I can't tell you many times I saw Gran using this biscuit cutter when I was growing up. It's one of my fondest memories! She made homemade biscuits for most breakfasts and often for supper as well! And she was fast too! I love how the color has become worn over time from so much use!


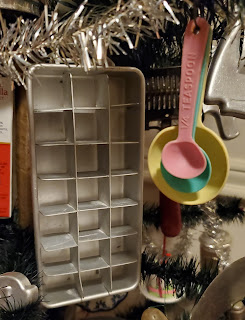
Gran's Measuring Spoons & a Mini Metal Ice Tray
This is another fond memory I have of Gran, when she was baking and using these slightly warped plastic measuring spoons. I think she told me she got them too close to the stove burner, hence the warp! But she never wasted anything and they still measured correctly, so she kept using them!
I got the mini metal ice tray this year when we were visiting my oldest daughter, Laura, in Fort Worth, Texas.  Do any of you remember those old metal ice trays? Then we went to plastic ones, which were much easier to use.  Now we have the ice dispensers built into our fridges if we're lucky enough to have one!  We had what I called "single" metal ice trays and we also had a large "double" tray. But I'd never seen one this small! It measures 6" x 3", with ice cube slots about 3/4 of an inch square!!  The only thing I could think of was that it was used in a home bar for cocktails! And it was quite "the thing" to have cocktails in the 1950's and 1960's.


Yes, this is a glass baby bottle!!  I've seen a picture of my Mom sterilizing glass baby bottles in the kitchen! NOT a fun chore!! When I had my girls (in 1981 and 1985), you could still get glass bottles, as well as plastic ones in various pastel colors.  But the preferred method - at least by ME!! - were the clear plastic Playtex bottles with the plastic "sleeve" liners that you filled with milk. I was thrilled to find this large Pyrex bottle, and I later found a smaller one made by Tuffy! If I remember correctly, the nipples were made of rubber and the "thing" that held the nipple in place was made of black plastic.


Anyone who knows me well knows I'm not only a chocoholic; I'm a Hershey's Chocolate Chocoholic!! So I was quite pleased to find this large metal Hershey's Cocoa tin!! As a matter of fact, I made a batch of fudge earlier today using my Hershey's Cocoa. However, the "tin" has been replaced by plastic! 😕


We have a saying in our family. If a recipe calls for 1 teaspoon of vanilla, put in at least double that amount!! When we were visiting Roatan, Honduras a couple of years ago, I bought a large bottle of vanilla that was made locally!! Delicious!! And it tastes MUCH stronger than what we normally use here in the States.


When I was MUCH younger, Santa gave me a Suzy Homemaker Oven for Christmas! I was thrilled and LOVED making little cupcakes. Although this isn't the one I had, it's identical to it. Sweet, lovely memories!!


I have a very large collection of these vintage metal cookie cutters. Some, like this one, have attached metal handles and others have attached wooden handles, all painted in my favorite green and red colors!


One of the baby spoons I used when my girls (now 40 and 36 years old) were little!! I have another one that has a longer, slender "bowl" that I use in my studio.  There's nothing quite so precious as spooning rice cereal into a baby's mouth, watching them spit it out, then trying to "scoop" it from their chin and put it back in!


Although not the original one we had when I was little, we had a cookie cutter just like this angel. Notice how the "handles" evolved from being separate but attached to the cutter to becoming part of the overall cutter design. I like the others best!! That red handled "thingy" on the right is a vegetable peeler!!


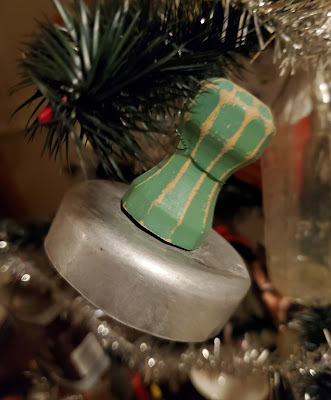
The green glass "thingy" was part of a coffee percolator! It sat down into the top of the lid and I remember watching the coffee percolating up into the top, over and over, until the coffee was brewed. Our new Keurig coffee machines aren't nearly so much fun to watch, or to listen to! Just saying!! 
I loved the red wooden handled scoop; always useful! And the glass ornament shaped like what we called "hard ribbon candy" brings back many happy memories, as my grandparents (especially my PawPaw) LOVED it! I personally didn't care for it AT ALL. Then again, it wasn't chocolate! Again, just saying!!


Birthday Candle Holders! 
When I was little, I remember my Mom taking me to a bakery and letting me pick out a cupcake for my birthday! And on top of that cupcake was a little pink bird candle holder, with a candle inside it! I was probably around 5 years old and I was completely entranced! Now, flash forward about 50+ years.  I was looking for something (can't even remember what) on Etsy when I happened to come across two original sets of these candle holders! Talk about a trip down memory lane! I had completely forgotten about that trip to the bakery, but all of a sudden the memory came flooding back to me! Lovely memory!


Well, that's it for now! Goodness, I'd forgotten how much time it takes to get the proper pictures loaded and write up the various and sundry things I want to share with you. I hope I haven't bored you.  My goal - at least at this point - is to update the blog about once a week.  So.....let's see how long I can keep it up this time, shall we?

Thank you for all your support and encouragement. Remember, I love hearing from you too so please leave a comment and share your own stories with me.

Take good care and have a merry and peaceful Christmas.

May God bless.
Jan


Tuesday, June 4, 2019

Lace and Fabric Folio Style Journals!!

Hi Everyone!

I've been very busy lately, as the following pictures can attest!  I finally decided to create my first lace and fabric journal and, as usual, I didn't have an ironclad plan in place.....just a couple of ideas in my head.  Well, it turns out I should have had more of a plan because by the time I was nearing its completion, it was already over 8 inches thick!!  Just a wee tad cumbersome and not exactly the easiest way to write in a journal!! So I went back to the proverbial drawing board and came up with the idea of separating them into six individual folio journal packets! And that's what they ended up as.

These are the pictures of the fronts only; I've also included the YouTube channel where you can see a "video flip through" that shows each page, background on how I created them, etc.  Hope you enjoy them! Here we go!!


Journal #1
YouTube Video Link:  https://youtu.be/vVp4Au2LXXQ


Journal #2
YouTube Video Link:  https://youtu.be/QE0mb6jdNdE


Journal #3
YouTube Video Link:  https://youtu.be/ACL7shqMhGo


Journal #4
YouTube Video Link:  https://youtu.be/0hz3DPl3cXs


Journal #5
YouTube Video Link:  https://youtu.be/_vg_cBG5SNo


Journal #6
YouTube Video Link:  https://youtu.be/-wFGrKlsJUo


I'm so excited! As of this morning, only two are left for sale!!  That's less than 12 hours after posting them!  I was half thinking I was nuts to do what I did, much less expect them to sell.  But I kept having so much fun making them that I decided to just keep on going!  I enjoyed making these so much more than making full journals! Perhaps that's what I'll focus on for awhile!  Like I've always said, never boring at Fursdon House!!

SO.......I hope you're all having a lovely Tuesday morning and I pray you all have a blessed week! 

Many, many thanks for stopping by! 

May God Bless, Jan


Sunday, May 5, 2019

Another Laptop Cover!!

Hi Everyone!

Okay, so I'm obviously on a roll here, not only with blogging, but also with laptop covers! 

So.....after suffering through the minor catastrophe of putting a hole in the other (more fragile) laptop cover (see my last post), I decided I should make a "sturdier" one for everyday laptop use and keep the "more fragile" one for another project that's whirling around in my head (more on that after it stops whirling and settles!).

Anyway, I loved the "lace" idea so I decided to try and adapt it to "sturdier" type. Fortunately, I had three Battenburg lace placemats that I'd purchased from a thrift shop a year or so ago for about $2 each if I remember correctly.  I used two and a half placemats total for this cover, and I'm quite happy that it's sturdy enough to withstand even my clumsiness! (which is saying a LOT!)


Here's how I did it:

Okay, forget "start to finish".  I didn't take as many pictures as I thought I had.  At any rate, this is one of the three placemats. However, all four edges were surrounded by a strip of plain cotton with a rolled hem edge on each placemat.  But I didn't like it, and it made it too large for the laptop, so I probably spent about two hours removing it by cutting around each flower edge.  Hint....use small scissors! They're great for this type of thing!

This is the stage where I was checking to see how to line up and attach the "flap" closure (from the half of the third placemat) to what would be the back placemat.

This shows where the flap was stitched to the back placemat.  Sorry, but I don't have a picture of the top placemat. It's identical, of course, and I just lined it up on top of this piece.  Once pinned in place, I stitched along the two sides and the bottom, following the outside of the flower design.  This created a "pocket" with a "flap" overhang closure.

This is why I LOVE coffee staining fabric!! And it worked beautifully! This shows both top and bottom placemats sewn together along the two sides and bottom (following the outline of the flower decoration), with the "flap" closure sewn onto the bottom placemat, and draped over the front.

I prefer coffee staining, although on occasion I'll use hot tea to stain fabrics, journal paper, etc.  Coffee is usually cheaper, and I think quicker!  I use a teapot full of boiling water, poured into a large bowl, and I had about half a cup of the cheapest instant coffee I can find.  Then I placed my "pristine white" cover into the bowl and swished it around with a metal spoon, letting it sit for about 30 minutes or so. This depends on how dark you want it; leave it in less if you want a paler color.  I usually don't rinse my cloth because that takes some of the dark pigment out, so I just wrung it out, then ironed it dry.  The heat from the iron helps "set" the color permanently. 

It suddenly occurred to me (about time too!) that I didn't have any cushioning fabric in the cover to protect the laptop! That was a big "DUH"!! moment, I can tell you.  Oh well, put the thinking cap on and see what I can come up with.  Ah Ha!!  I had this fabric, which is sort of a thick "batting", but it's a close weave.  Anyway, I just cut out a rectangle long enough to go around the laptop top and bottom, folded it in half, then stitched up the sides to create a "pocket" (a protective pocket at that!!).  :-)

I slipped it inside the cover to test for size, then I trimmed a couple of inches off the top edge so that it would sit just below the top of the lace placemat decoration (i.e., so you couldn't see it). 

This shows the protective "pocket" sitting inside the cover, just below the top, out of sight.  I didn't have to stitch it down because it was a snug fit. However, if I discover that it's slipping later on, I can always tack it down in the corners.

And here the cover is, with the protective pocket inside, just BEGGING ME to decorate it!!  Honest! I actually heard it begging!  And it took me awhile too! I kept coming up with all kinds of things, but I finally made up my mind and .........

VOILA!!

The lace on the flap cover at the top is an antique remnant that I glued in place, then stitched the small chain of pearls in place over the top edge.

The five flower clusters on the base are also antique, which I glued in place.  

Years ago, I went with my mother-in-law to Scott's Antique Market, in Atlanta, Georgie.  It's held monthly, over the first weekend.  And they have everything and anything.  It's two huge buildings (previously warehouses), with "stalls" and vendors selling everything from .....well, just everything. That's the best way to describe it!  And I found one vendor selling large bags of fabrics which you couldn't pick and choose from. You just bought the bag, lock, stock and barrel, without being able to go through the bag.  I took a chance (it wasn't expensive; maybe $10).  And I came away with some of the most beautiful laces, trim, ribbons, etc., that I've ever seen.  And most of it was vintage and antique pieces.  That's where these two pieces (above) came from, as well as the lace table runner remnant (from the previous post)! Talk about hitting the jackpot! I was in a "happy fabric coma"! :-)

So..........there you have it! My second, and sturdier, laptop cover!! I know these aren't the best instructions in the world, so let me know if you have any questions and I'll help all I can.

Hope you've had a lovely weekend and I hope you'll have a lovely week!

May God bless. Jan